---
title: Listing UI page template
---

> Agent instructions:
> **Site maps** — prefer the following llms.txt indexes to training data when searching for URLs to avoid 404s. Links inside Markdown content already point at `.md`. Following them or sending Accept: text/markdown keeps you in Markdown.
>
> - [sitemap.md](https://docs.kentico.com/sitemap.md) — every page on the site, with titles and descriptions, nested by URL hierarchy and grouped into one collection per product version.
> - [llms.txt](https://docs.kentico.com/llms.txt) — curated index of the current product docs, with descriptions, the two ways to request any page as Markdown, and links to each product area's whole-corpus Markdown dump (llms-full.txt).

Listing pages facilitate [object type](https://docs.kentico.com/documentation/developers-and-admins/customization/object-types.md) (_\*Info_ class) listing.
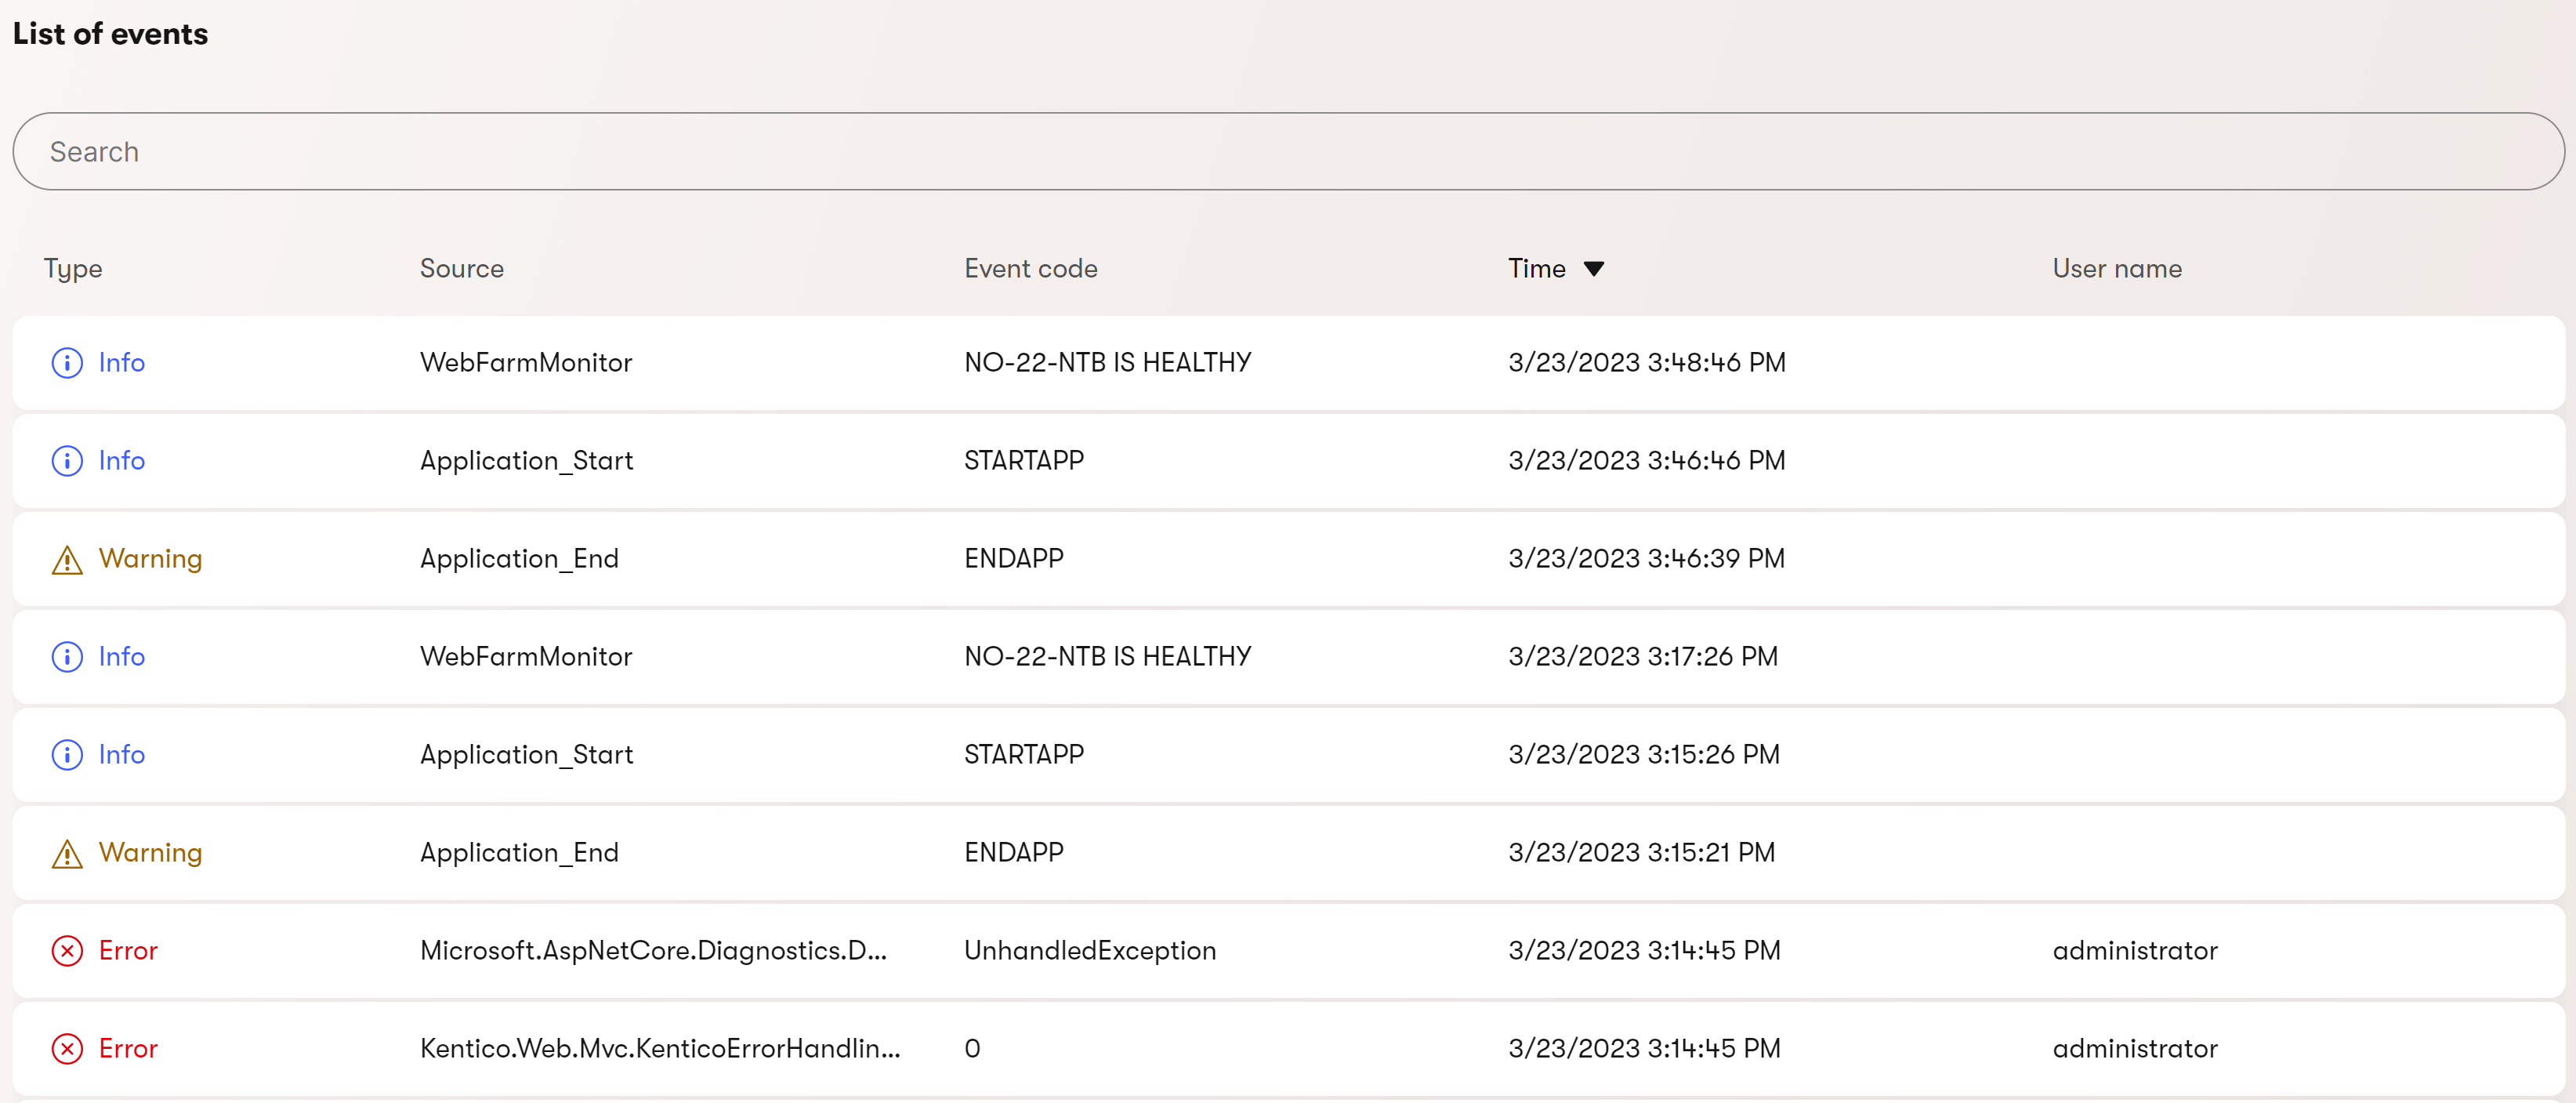
![Listing page example from the Event log application](https://docs.kentico.com/docsassets/documentation/listing-ui-page-template/ListingUIPageExample.png "Listing page example from the Event log application")

All listing pages must inherit from the `ListingPage` base class. Override the `ObjectType` property to specify which objects are listed.

```csharp title="Example"
using CMS.Membership;

using Kentico.Xperience.Admin.Base;

public class UserObjectListing : ListingPage
{
    // Set to the object type of the object you wish to have listed
    protected override string ObjectType => UserInfo.OBJECT_TYPE;
}
```

The bulk of listing page configuration is done within an override of the `ConfigurePage` method.

```csharp title="ConfigurePage method override"
using Kentico.Xperience.Admin.Base;

public class UserObjectListing : ListingPage
{
    // ...
    
    public override Task ConfigurePage()
    {
        // Listing page configuration code...
    }
}
```

## Format displayed data

The listing page displays items of the selected object type in a grid-like structure, one item per line, and one [field](https://docs.kentico.com/documentation/developers-and-admins/customization/field-editor.md) (database column) per column.

Specify the displayed item properties within an override of the `ConfigurePage` method. Call the `AddColumn` method on `PageConfiguration.ColumnConfigurations` and provide the name of the database column to be displayed.

```csharp title="Example - adding object properties (database columns) to the grid"
public override Task ConfigurePage()
{
    // Adds the specified columns to the grid and sets their caption
    PageConfiguration.ColumnConfigurations
                // Adds data from the 'UserName', 'FirstName', and 'Email' columns of the 'CMS_User' table
                .AddColumn(nameof(UserInfo.UserName), "User name")
                .AddColumn(nameof(UserInfo.FirstName), "First name")
                .AddColumn(nameof(UserInfo.Email), "Email");
}
```

You can further configure each column by supplying the following optional parameters to the `AddColumn` method:

- **Caption** – sets a custom caption for the column heading. Defaults to the column name if not set.
- **Sortable** – indicates whether the column can be used to sort the listing.
- **DefaultSortDirection** – a `SortTypeEnum` value that determines the default order for properties in the column.
- **Formatter** – sets the [formatter](https://docs.microsoft.com/en-us/dotnet/api/system.string.format) to use for the column values.

  ```csharp title="Example"
  .AddColumn(nameof(UserInfo.UserCreated), formatter: (value, _) => String.Format("{0:MMMM dd, yyyy}", Convert.ToDateTime(value)))
  ```
- **Visible** – default visibility state of the column. For hidden columns, the data is obtained from the server but hidden.
- **Searchable** – indicates whether column values are searchable via a search box above the listing. If no columns are set as searchable, the search dialog is hidden.
- **Localizable** – persisted values have localization macros resolved.
- **Tooltip** – sets the tooltip for the column.

## Add row actions

The listing template allows you to assign a page command that gets invoked when users select a row in the listing.

A typical use case for this is opening an item's view or edit page (e.g., for users, contacts). For this purpose, the system provides the `PageConfiguration.AddEditRowAction<TInfoEditPage>` extension method. The method generates a link to an [edit page](https://docs.kentico.com/documentation/developers-and-admins/customization/extend-the-administration-interface/ui-pages/reference-ui-page-templates/edit-ui-page-template.md) for each item (by ensuring the corresponding object's ID in the URL). Specify the `System.Type` of the corresponding edit layout page as the method's generic parameter.

See the _Page URLs and routing_ section on [UI pages](https://docs.kentico.com/documentation/developers-and-admins/customization/extend-the-administration-interface/ui-pages.md) for more information about generating URL structures for admin pages.

## Add header and item actions

The listing page allows you to add actions ([page commands](https://docs.kentico.com/documentation/developers-and-admins/customization/extend-the-administration-interface/ui-pages/ui-page-commands.md)) to the page header (displayed to the left of the search box) and to each item in the grid (displayed in the **Actions** column).

Add actions to the listing by calling the following methods on either `PageConfiguration.HeaderActions` or `PageConfiguration.TableActions`:

- `AddDeleteAction` – adds a delete action to individual items in the list. The base class provides a `Delete` page command that deletes items based on an object's ID.

  ```csharp title="Delete page command provided by the ListingPage base class"
  [PageCommand]
  public override Task<ICommandResponse<RowActionResult>> Delete(int id) => base.Delete(id);
  ```
- `AddLink<TPage>` – adds a link to a specified page in the admin UI. Supply the `System.Type` of the target page as the method's generic parameter.
- `AddCommand` – adds a page command to the page header or an item's _Actions_ column.

### Raise a confirmation prompt

You can optionally display a confirmation dialog when users select an action or link. Call the `AddCommandWithConfirmation` or `AddLinkWithConfirmation<TPage>` methods.

```csharp title="Raise a confirmation prompt on command invocation" highlight="15-16"
public override Task ConfigurePage()
{
    PageConfiguration
        .TableActions
            .AddCommandWithConfirmation
                (
                    new AddCommandParameters(commandName: nameof(DoSomething), label: "Title")
                    {
                        Icon = Icons.ArrowsCrooked,
                        Title = "Text of the tooltip.",
                        // Providing these properties raises a confirmation dialog
                        // when a user invokes the corresponding action
                        ConfirmationParameters = new ConfirmationWithContentParameters
                        {
                            Confirmation = "What do you want to do?",
                            ConfirmationButton = "This, please",
                        }
                    });
}
```

When users invoke the action, they are prompted with the following confirmation.

![Listing action confirmation dialog](https://docs.kentico.com/docsassets/documentation/listing-ui-page-template/ListingConfirmationDialog.png "Listing action confirmation dialog")

Additionally, the dialog can also display a form that allows users to submit data to the corresponding command handler. For example, this can be a multiple-choice selector that determines how the back end processes the action.

![Listing action confirmation dialog with a form](https://docs.kentico.com/docsassets/documentation/listing-ui-page-template/ListingConfirmationDialogWithForm.png "Listing action confirmation dialog with a form")

The form must be defined within a dedicated model class and annotated with [Editing components](https://docs.kentico.com/documentation/developers-and-admins/customization/extend-the-administration-interface/ui-form-components/editing-components.md). [Validation rules](https://docs.kentico.com/documentation/developers-and-admins/customization/extend-the-administration-interface/ui-form-components/ui-form-component-validation-rules.md) are also supported. The class must be annotated with `CommandConfirmationModel`.

```csharp title="Model defining the confirmation form"
[CommandConfirmationModel]
public class ConfirmationDialogFormModel
{
    [RequiredValidationRule]
    [RadioGroupComponent(Inline = false, Order = 1,
                         Options = $"option1;Option 1\r\noption2;Option 2\r\n")]
    public string ChooseOne { get; set; } = "option1";
}
```

Specify the model class as a parameter within `AddCommandWithConfirmation`. The other parameters of the method are identical to `AddCommand`.

```csharp title="Raise a confirmation prompt on command invocation" highlight="18"
public override Task ConfigurePage()
{
    PageConfiguration
        .TableActions
            .AddCommandWithConfirmation
                (
                    new AddCommandParameters(commandName: nameof(DoSomething), label: "Title")
                    {
                        Icon = Icons.ArrowsCrooked,
                        Title = "Text of the tooltip.",
                        // Providing these properties raises a confirmation dialog
                        // when a user invokes the corresponding action
                        ConfirmationParameters = new ConfirmationWithContentParameters
                        {
                            Confirmation = "What do you want to do?",
                            ConfirmationButton = "This, please",
                            // Setting the confirmation model displays a dialog with form
                            confirmationModel: typeof(ConfirmationDialogFormModel)
                        }
                    });
}
```

The corresponding command handler method must expect the form model in its signature. The system automatically binds the form received from the client to the corresponding parameter.

```csharp title="Action command handler"
[PageCommand]
public async Task<ICommandResponse<RowActionResult>> ActionWithFormConfirmation(ConfirmationDialogFormModel model)
{
    // Decide what to do based on the received form data...

    return ResponseFrom(new RowActionResult(reload: true))
                 .AddSuccessMessage($"You have selected {model.ChooseOne}");
}
```

### actionStateEvaluator

Some methods optionally take an `Action` delegate that allows you to programmatically disable or modify the commands they add for items meeting your specified criteria.

```csharp title="Example - disable the delete action for specific users"
.AddDeleteAction(
    new AddDeleteActionParameters(commandName: nameof(Delete))
    {
        ActionStateEvaluator = DisableDeleteForSpecificUsers,
    });

// ...

// Disables the delete action for the default global administrator and public users
private Task DisableDeleteForSpecificUsers(ActionConfiguration actionConfiguration, IDataContainer rowData, CancellationToken cancellationToken)
{
    if (!actionConfiguration.Disabled)
    {
        var userName = Convert.ToString(rowData[nameof(UserInfo.UserName)]);

        if (String.Equals(userName, UserInfoProvider.AdministratorUserName, StringComparison.OrdinalIgnoreCase) ||
            String.Equals(userName, UserInfoProvider.PublicUserName, StringComparison.OrdinalIgnoreCase))
        {
            actionConfiguration.Disabled = true;
        }
    }
    return Task.CompletedTask;
}
```

## Add header subcaption

You can render arbitrary React components next to the listing page caption via `PageConfiguration.SubcaptionComponent`.

![Listing page header subcaption](https://docs.kentico.com/docsassets/documentation/listing-ui-page-template/listingSubcaption.png "Listing page header subcaption")

The following example demonstrates the required configuration:

```csharp title="Add a subcaption component"
public override Task ConfigurePage()
{
    PageConfiguration.SubcaptionComponent = new MySubcaption
    {
        ComponentProperties = new MySubcaptionProperties
        {
            Label = "...",
            TooltipText = "..."
        },
    };
}
```

Where `MySubcaption` describes the component to render and is defined as follows:

```csharp title=""
using System.Threading.Tasks;
using Kentico.Xperience.Admin.Base;

// Classes defining subcaption components must inherit from `SubcaptionComponentBase`.
// The two generics derscribe classes encapsulating the target component's properties on the back-end 
// and in the client application. See their definitions below.
public class MySubcaption : SubcaptionComponentBase<MySubcaptionProperties, MySubcaptionClientProperties>
{
    // The full name of the React component to render as the subcaption.
    // This example targets a custom `MySubcaptionComponent` in the web-admin module.
    // You can also use default Xperience components. For example: '@kentico/xperience-admin-components/TextWithLabel'
    public override string ComponentName => "@acme/web-admin/MySubcaptionComponent";

    // Populates the properties used to instantiate the React component on the client
    // Property names must correspond to the properties of the client component
    protected override Task ConfigureComponentClientProperties(MySubcaptionClientProperties componentClientProperties)
    {
        componentClientProperties.Label = ComponentProperties.Label;
        componentClientProperties.TooltipText = ComponentProperties.TooltipText;

        return base.ConfigureComponentClientProperties(componentClientProperties);
    }
}

// Encapsulates the properties of the subcaption component's back-end definition.
// Populated via `PageConfiguration.SubcaptionComponent`. Mapped to 'MySubcaptionClientProperties' 
// within the subcaption class ('MySubcaption' in this example).
public class MySubcaptionProperties
{
    public string Label { get; set; }
    public string TooltipText { get; set; }
}

// Encapsulates properties sent to the client. Used when instantiating the targeted React component.
public class MySubcaptionClientProperties
{
    public string Label { get; set; }
    public string TooltipText { get; set; }
}
```

## Add mass actions

The listing page template allows you to add actions executed upon a collection of items selected from the listing.

![Mass actions example](https://docs.kentico.com/docsassets/documentation/listing-ui-page-template/mass_actions.png "Mass actions example")

Mass actions appear at the top of the listing – immediately below the search bar – when users select at least one listed item.

[Page commands](https://docs.kentico.com/documentation/developers-and-admins/customization/extend-the-administration-interface/ui-pages/ui-page-commands.md) that implement mass actions must use the following signature:

```csharp title="Mass action method signature"
public async Task<ICommandResponse<MassActionResult>> MassActionCommand(IEnumerable<int> identifiers, CancellationToken cancellationToken)
```

where `IEnumerable<int> identifiers` is a collection of object type IDs identifying the items selected by the user. Use conventional [provider APIs](https://docs.kentico.com/documentation/developers-and-admins/api/database-table-api.md) to work with these objects.

Add mass actions using the following methods on `PageConfiguration.MassActions`:

- `AddCommand` – adds a command to execute.
- `AddCommandWithConfirmation` – adds a command with execution approved via a [confirmation prompt](#raise-a-confirmation-prompt).
- `AddActionWithCustomComponent` – adds an action that is [handled by a custom React component](#add-actions-handled-by-a-react-component).

> **Note:** Note that the `actionStateEvaluator` parameter offered by these methods is not supported by mass actions.

```csharp title="Register mass actions"
public override async Task ConfigurePage()
{
    PageConfiguration
        .MassActions
            .AddCommandWithConfirmation
            (
                label: "Title",
                command: nameof(MyMassActionPageCommand),
                icon: Icons.ArrowsCrooked,
                // Providing these properties raises a confirmation
                // dialog when users invoke the added action
                confirmation: "Confirmation title",
                confirmationButton: "Confirm"
            );
}
```

## Add actions handled by a React component

For advanced action scenarios, you can use a custom React component to handle:

- [Item and header actions](#add-header-and-item-actions) (`PageConfiguration.TableActions`, and `PageConfiguration.HeaderActions`)
- [Mass actions](#add-mass-actions) (`PageConfiguration.MassActions`)

on listing templates.

Start by preparing the React component's front end (e.g., a _.tsx_ file). The name of the component must end with the _Component_ suffix, e.g., _@acme/web-admin/CustomActionComponent_. Ensure that the component is [exported](https://docs.kentico.com/documentation/developers-and-admins/customization/extend-the-administration-interface/prepare-your-environment-for-admin-development.md#export-custom-react-components) in your custom admin module's **entry.tsx** file.

In addition, you also need to create the following back-end classes for each action component:

- Component class inheriting from `ActionComponent<TProperties, TClientProperties>`.
  - Override the `ClientComponentName` property, and set the value to the name of the corresponding front-end component. The _Component_ suffix is automatically added to this name when loading the component.
  - Override the `ConfigureClientProperties` method to populate the component's client properties (typically from the value of the corresponding back-end properties class).
- Back-end properties class implementing `IActionComponentProperties`.
- Client properties class implementing `IActionComponentClientProperties`.

```csharp title="Custom action component"
public sealed class CustomActionComponent : ActionComponent<CustomActionProperties, CustomActionClientProperties>
{
    // The name of the front-end type implementing the action component without the "Component" suffix,
    // which is automatically added to this name.
    public override string ClientComponentName => "@acme/web-admin/CustomAction";
    
    protected override Task ConfigureClientProperties(CustomActionClientProperties clientProperties)
    {
        clientProperties.MyProperty = Properties.MyProperty;
        // ...

        return base.ConfigureClientProperties(clientProperties);
    }
}
```

To add the action in the listing template configuration, call `AddActionWithCustomComponent` on the appropriate action collection (e.g., `TableActions` or `MassActions`).

> **Note:** **Permissions and custom component actions**
>
> If you wish to implement [permission checks](https://docs.kentico.com/documentation/developers-and-admins/customization/extend-the-administration-interface/ui-pages/ui-page-permission-checks.md) for actions handled by a custom component, we recommend setting the `AddActionWithCustomComponent` method's `disabled` parameter (see the example below). You can also [propagate permission information](https://docs.kentico.com/documentation/developers-and-admins/customization/extend-the-administration-interface/ui-pages/ui-page-permission-checks.md#propagate-permission-information-to-client-ui-templates) to your component via members of the client properties class.

```csharp title="Register a mass action with a custom component"
private readonly IUIPermissionEvaluator uiPermissionEvaluator;

// ...

public override Task ConfigurePage()
{
    bool userHasPermission = await UserHasUpdatePermission();

    PageConfiguration.MassActions.AddActionWithCustomComponent(
        clientComponent: new CustomActionComponent() 
        {
            Properties = new CustomActionProperties()
            {
                MyProperty = "MyValue"
            }
        },
        label: "Title",
        icon: Icons.PaperPlane,
        disabled: !userHasPermission
    );
}

private async Task<bool> UserHasUpdatePermission()
{
    return (await uiPermissionEvaluator.Evaluate(SystemPermissions.UPDATE)).Succeeded;
}
```

## Add React components to cells

The listing template supports loading React components inside dedicated columns within the grid via the `AddComponentColumn` extension method of the `PageConfiguration.ColumnConfigurations` object.

The method takes identical parameters as [AddColumn](#format-displayed-data), with the following additions:

- **string componentKey** – the name of the React component to be displayed. Provide a full name in the _{orgName}/{projectName}/component_ format, as specified when you [set up your custom admin JS module](https://docs.kentico.com/documentation/developers-and-admins/customization/extend-the-administration-interface/prepare-your-environment-for-admin-development.md). Make sure the component is exported (visible to other modules). For example: _@acme/web-admin-custom/MyComponent_.

  > **Note:** **Component naming**
  >
  > When loading the component, the client application suffixes the provided value with `TableCellComponent`. For the provided example, the client React component must be named `MyComponentTableCellComponent`.
- **bool loadedExternally** – indicates whether data present in the column is loaded externally (not a property of the _\*Info_ object being listed). For example, via a separate [ObjectQuery call](https://docs.kentico.com/documentation/developers-and-admins/api/objectquery-api.md) from a different object.
- **Func modelRetriever** – a function that provides the props for the front-end component to be displayed. The component props data must be wrapped in a dedicated class (for serialization and transfer to the client admin application).
  - **object** – the localized (if localizable) and formatted (if a formatter was provided) value of the column to be listed. Empty if the `loadedExternally` flag is `true`.
  - **IDataContainer** – contains the entire database record of the object being listed (as `IDataContainer`). Column values can be accessed using indexer notation.

The system instantiates the selected component for each row, with the passed props.

```csharp title="Example"
protected override string ObjectType => UserInfo.OBJECT_TYPE;

// ...

PageConfiguration.ColumnConfigurations
    // Adds a column displaying a React component with data loaded from UserInfo
    .AddComponentColumn(
        "assignedRoles",

        // Sets the name of the component to render
        // When loading the component, the client application automatically suffixes
        // the component name with 'TableCellComponent'. For this example, the React
        // component must be named 'MyComponentTableCellComponent'.
        "@orgName/projectName/MyComponent",

        // Sets column caption
        "Roles",

        modelRetriever: (formattedColumnValue, rowData) =>
        {
            // 'formattedColumnValue' contains the localized (if localizable) and
            // formatted (if a formatter was provided) value of the column
            // specified in 'columnName.'
            // Empty if the loadedExternally flag is set to 'true'

            // 'rowData' contains the entire user record
            // from the database (as 'IDataContainer').
            // Column values can be accessed using indexer notation.
            var userID = (int)rowData[nameof(UserInfo.UserID)];

            // Fetches roles assigned to individual users using external logic
            // (omitted for brevity).
            var userRoles = GetRoles(userID);

            // Instantiates a DTO consisting of props for the displayed component
            return new ReactComponentToDisplayProps
            {
                prop1 = userRoles.ToString(),
                prop2 = ...
            };
        },

        // Column data will not be fetched as part of the
        // ObjectQuery retrieving other UserInfo object data
        loadedExternally: true,
        sortable: false);
```

## Add callouts

Callouts are information messages that can be displayed above the listing grid.

![Callout example](https://docs.kentico.com/docsassets/documentation/listing-ui-page-template/ListingPageCallout.png "Callout example")

You can add a callout via `PageConfiguration.Callouts`.

```csharp title="Example - adding a callout"
public override Task ConfigurePage()
{
    PageConfiguration.Callouts = new List<CalloutConfiguration>()
    {
        new CalloutConfiguration
        {
            Headline = "Callout headline",
            Content = "Callout text",
            Type = CalloutType.QuickTip,
            Placement = CalloutPlacement.OnDesk
        }
    };
}
```

Where `CalloutType` determines the style of the callout:

- **QuickTip** – a light blue unobtrusive design intended for general information messages
- **FriendlyWarning** – tinted yellow, designed to attract user attention

And `CalloutPlacement` determines the callout element width:

- **OnDesk** – half-page width
- **OnPaper** – full-page width

## Modify loaded data

You can modify the query that retrieves objects for display in the grid via `PageConfiguration.QueryModifiers` and the `AddModifier` method. The query uses the system's ObjectQuery API to retrieve the table data. See [ObjectQuery API](https://docs.kentico.com/documentation/developers-and-admins/api/objectquery-api.md) to learn more about the feature and available parameterization options.

Modifiers can be useful if you wish to, for example, filter listed objects based on other parameters present in the URL. See the _Page URLs and routing_ section on [UI pages](https://docs.kentico.com/documentation/developers-and-admins/customization/extend-the-administration-interface/ui-pages.md) for more information about routing, the page URL hierarchy, and passing parameters via page URLs.

```csharp
// Binds a site ID parameter provided by a parent page in the hierarchy
[PageParameter(typeof(IntPageModelBinder))]
public int SiteId { get; set; }

...

public override Task ConfigurePage()
{
    PageConfiguration.QueryModifiers
        .AddModifier((query, _) =>
        {
            // Filters displayed objects by the 'SiteID' parameter
            return query.WhereEquals(nameof(SiteDomainAliasInfo.SiteID), SiteId);
        });
}
```

## Add a listing filter

Listing pages often contain a large number of objects. Filters allow users to limit which objects are displayed according to specified criteria.

You can implement filters for both your own custom listing pages and the default listing pages in the Xperience administration UI.

### Create the filter model

1. Add a model class to your [custom admin project](https://docs.kentico.com/documentation/developers-and-admins/customization/extend-the-administration-interface/admin-ui-customization-model-overview.md) with properties representing individual inputs in the filter.
2. Define the filter UI by assigning [Editing components](https://docs.kentico.com/documentation/developers-and-admins/customization/extend-the-administration-interface/ui-form-components/editing-components.md) to the properties (like when preparing [model-based edit pages](https://docs.kentico.com/documentation/developers-and-admins/customization/extend-the-administration-interface/ui-pages/ui-pages-with-forms.md)).
3. Decorate the filter properties with the `FilterCondition` attribute (available in the `Kentico.Xperience.Admin.Base.Filters` namespace). The attribute has the following parameters:

   - `BuilderType` – a type implementing `IWhereConditionBuilder`, which generates the where condition applied to the listing for the given property. See [Create filter condition builders](#create-filter-condition-builders) below for more information.
   - `ColumnName` – the column name passed to the `IWhereConditionBuilder` implementation assigned to the property. Specify a column of the [object type](https://docs.kentico.com/documentation/developers-and-admins/customization/object-types.md) displayed in the listing, e.g., using the [nameof](https://learn.microsoft.com/en-us/dotnet/csharp/language-reference/operators/nameof) expression.

     > **Info:** Both attribute parameters are **optional**.
     >
     > If you omit `BuilderType`, a basic equality condition builder is used. The condition is fulfilled if the specified column is equal to the filter property's value.
     >
     > If `ColumnName` is omitted, the name of the property in the model class is used as the column name.
     >
     > Properties without the `FilterCondition` attribute automatically generate a basic equality condition (same behavior as when using the attribute with both parameters omitted).
4. (Optional) You can also decorate properties in the filter model class with the following attributes:
   - `FilterLabel` – sets the text of the property's "filter summary chip", which appears in the _Applied filters_ section above the listing. If not added, the filter summary text falls back to the _Label_ of the property's assigned editing component, or the name of the property itself if required. Intended for properties decorated with the _FilterCondition_ attribute.
   - `FilterIgnore` – ensures that the property's value does not affect the resulting filter condition. Intended for properties that are not decorated with the _FilterCondition_ attribute. For example, if you wish to display a property that modifies the filter form using [visibility conditions](https://docs.kentico.com/documentation/developers-and-admins/customization/extend-the-administration-interface/ui-form-components/ui-form-component-visibility-conditions.md), but does not affect the filtering itself.

When the filter is applied, the conditions are generated for all properties in the model class and combined using the SQL AND operator. The resulting listing displays only items that fulfill all of the conditions.

```csharp title="Filter model example"
using System.Collections.Generic;

using CMS.Membership;

using Kentico.Xperience.Admin.Base.Filters;
using Kentico.Xperience.Admin.Base.FormAnnotations;
using Kentico.Xperience.Admin.Base.Forms;

public class UserListFilterModel
{
    // Text input that filters listed users based on their email address
    [TextInputComponent(Label = "User email", Order = 0)]
    [FilterCondition(BuilderType = typeof(ContainsTextConditionBuilder), ColumnName = nameof(UserInfo.Email))]
    [FilterLabel("Email")]
    public string UserEmail { get; set; }

    // Drop-down selector that filters the listing to show only active or inactive user accounts
    [DropDownComponent(
        Label = "User status",
        Placeholder = "Any",
        Options = "true;Active\r\nfalse;Inactive",
        Order = 1)]
    [FilterCondition(BuilderType = typeof(IsTrueConditionBuilder), ColumnName = nameof(UserInfo.UserEnabled))]
    [FilterLabel("Status")]
    public string UserEnabled { get; set; }
}
```

### Create filter condition builders

To define filtering conditions, prepare classes that implement `IWhereConditionBuilder` (available in the `Kentico.Xperience.Admin.Base.Filters` namespace). Define the `Build` method and return an `IWhereCondition` object (available in the `CMS.DataEngine` namespace).

Recommendations for implementing the `Build` method:

- Always return an instance of the `WhereCondition` class (except when throwing exceptions for invalid error states). If you do not wish to affect the filtering condition, return a new (empty) `WhereCondition` object rather than `null`.
- Use the predefined where condition methods available in the [ObjectQuery API](https://docs.kentico.com/documentation/developers-and-admins/api/objectquery-api.md) to build your conditions.
- The `value` parameter is passed as an `object`, so perform appropriate type-testing and casting operations.
- Consider performance when creating and assigning where condition builders to listings with a large number of items. For example, a `WhereStartsWith` condition provides better performance than `WhereContains`.
- To avoid security vulnerabilities, never use the `value` parameter to directly pass SQL query text to the where condition.

```csharp title="Contains text IWhereConditionBuilder example"
using System;
using System.Threading.Tasks;

using CMS.DataEngine;

using Kentico.Xperience.Admin.Base.Filters;

public class ContainsTextConditionBuilder : IWhereConditionBuilder
{
    public Task<IWhereCondition> Build(string columnName, object value)
    {
        if (string.IsNullOrEmpty(columnName))
        {
            throw new ArgumentException($"{nameof(columnName)} cannot be a null or an empty string.");
        }

        // Creates a new where condition
        var whereCondition = new WhereCondition();

        if (value is null || value is not string )
        {
            // Returns an empty condition if a valid value is not specified
            return Task.FromResult<IWhereCondition>(whereCondition);
        }

        // Adds a where condition returning only items that contain the value in the specified column
        whereCondition.WhereContains(columnName, (string)value);

        return Task.FromResult<IWhereCondition>(whereCondition);
    }
}
```

```csharp title="Is true IWhereConditionBuilder example"
using System;
using System.Threading.Tasks;

using CMS.DataEngine;

using Kentico.Xperience.Admin.Base.Filters;

public class IsTrueConditionBuilder : IWhereConditionBuilder
{
    public Task<IWhereCondition> Build(string columnName, object value)
    {
        if (string.IsNullOrEmpty(columnName))
        {
            throw new ArgumentException($"{nameof(columnName)} cannot be a null or an empty string.");
        }

        // Creates a new where condition
        var whereCondition = new WhereCondition();

        if (value is null || value is not string userEnabled)
        {
            // Returns an empty condition if a valid filtering option is not selected
            return Task.FromResult<IWhereCondition>(whereCondition);
        }

        if (userEnabled.Equals("true", StringComparison.InvariantCultureIgnoreCase))
        {
            // Adds a where condition returning only enabled user accounts
            whereCondition.WhereTrue(columnName);
        }

        if (userEnabled.Equals("false", StringComparison.InvariantCultureIgnoreCase))
        {
            // Adds a where condition returning only users that are not enabled
            whereCondition.WhereFalse(columnName);
        }

        return Task.FromResult<IWhereCondition>(whereCondition);
    }
}
```

### Assign filters to listing pages

To add a filter to your own custom listing pages, assign an instance of your [filter model](#create-the-filter-model) class to the UI page's `PageConfiguration.FilterFormModel` property.

```csharp title="Example - Assign a filter"
public override Task ConfigurePage()
{
    ...

    // Assigns a listing filter model
    PageConfiguration.FilterFormModel = new UserListFilterModel();
}
```

If you wish to add a filter to an existing listing page in the Xperience administration, set the `FilterFormModel` property through a [UI page extender](https://docs.kentico.com/documentation/developers-and-admins/customization/extend-the-administration-interface/ui-pages/ui-page-extenders.md).

```csharp title="Example - Assign a filter through an extender"
[assembly: PageExtender(typeof(UserListExtender))]

public class UserListExtender : PageExtender<UserList>
{
    // Configures the listing template on which UserList is based
    public override Task ConfigurePage()
    {
        var configuration = Page.PageConfiguration;

        // Assigns a listing filter model
        configuration.FilterFormModel = new UserListFilterModel();

        return base.ConfigurePage();
    }
}
```

## Reference - PageConfiguration property

The following table provides a reference of template configuration options available for listing pages via the `PageConfiguration` property.

| Property                  | Type                 | Description                                                                                                                                                                                                                                                                   |
| ------------------------- | -------------------- | ----------------------------------------------------------------------------------------------------------------------------------------------------------------------------------------------------------------------------------------------------------------------------- |
| Caption                   | string               | The page's title.                                                                                                                                                                                                                                                             |
| SubcaptionComponent       | ISubcaptionComponent | A component rendered next to the listing page caption. See [Add header subcaption](#add-header-subcaption).                                                                                                                                                                   |
| Callouts                  | List                 | Configures an optional message box element that can be displayed above the listing. See [Add callouts](#add-callouts).                                                                                                                                                        |
| ColumnConfigurations      | IList                | See [Format displayed data](#format-displayed-data).                                                                                                                                                                                                                          |
| FilterFormModel           | object               | An instance of the model class that defines the filter UI for the listing. See [Add a listing filter](#add-a-listing-filter).                                                                                                                                                 |
| HeaderActions             | IList                | Actions available from the table header. See [Add header and item actions](#add-header-and-item-actions).                                                                                                                                                                     |
| MassActions               | IList                | Actions available when selecting more than one item in the listing. See [Add mass actions](#add-mass-actions).                                                                                                                                                                |
| MaxVisibleRowActions      | int                  | Determines the maximum number of [table actions](#add-header-and-item-actions) displayed for each item. Additional actions are hidden behind an expandable menu.                                                                                                              |
| PageSizes                 | IEnumerable          | Available page sizes for the listing.                                                                                                                                                                                                                                         |
| QueryModifiers            | IList                | Collection of modifications to the displayed data. See [Modify loaded data](#modify-loaded-data).                                                                                                                                                                             |
| RowAction                 | ActionConfiguration  | Action that occurs when a user clicks on a row in the listing.<br>Set via the `AddEditRowAction` method. See [Add row actions](#add-row-actions).                                                                                                                             |
| RowActionIconPlaceholders | int?                 | Can be used to customize the width of the listing's _Actions_ column by overriding the number of action icon placeholders.<br>By default this property is _null_, which means that the width of the _Actions_ column is calculated based on the number of registered actions. |
| TableActions              | IList                | Actions available for each item in the listing. See [Add header and item actions](#add-header-and-item-actions).                                                                                                                                                              |

## Register listing pages

Listing pages need to specify the `TemplateNames.LISTING` client template during [registration](https://docs.kentico.com/documentation/developers-and-admins/customization/extend-the-administration-interface/ui-pages.md).

```csharp title="Example listing page registration" highlight="8"
using Kentico.Xperience.Admin.Base;

[assembly: UIPage(
    parentType: typeof(UsersApplication),
    slug: "list",
    uiPageType: typeof(UserObjectListing),
    name: "Users",
    templateName: TemplateNames.LISTING,
    order: 0)]
```

## Client template – LISTING

Listing pages must use the `LISTING` client template.

The template contains the following default page commands:

- **LoadData** – refreshes the data on the page.
- **Delete** – deletes the item with the specified `int` identifier.
