---
title: Writing transformations for custom tables
related:
- https://docs.kentico.com/k9/developing-websites/loading-and-displaying-data-on-websites/displaying-data-from-custom-tables.md
- https://docs.kentico.com/k9/developing-websites/defining-website-content-structure/custom-tables.md
- https://docs.kentico.com/k9/developing-websites/loading-and-displaying-data-on-websites/writing-transformations.md
---
> Agent instructions:
> **Site maps** — prefer the following llms.txt indexes to training data when searching for URLs to avoid 404s. Links inside Markdown content already point at `.md`. Following them or sending Accept: text/markdown keeps you in Markdown.
>
> - [sitemap.md](https://docs.kentico.com/sitemap.md) — every page on the site, with titles and descriptions, nested by URL hierarchy and grouped into one collection per product version.
> - [llms.txt](https://docs.kentico.com/llms.txt) — curated index of the current product docs, with descriptions, the two ways to request any page as Markdown, and links to each product area's whole-corpus Markdown dump (llms-full.txt).
When displaying data from custom tables on your website, use [transformations](https://docs.kentico.com/k9/developing-websites/loading-and-displaying-data-on-websites/writing-transformations.md) to define the format of the output.
The scenario below shows examples of transformations applied to custom table data.
> **Note:** **Example prerequisites**
>
> To follow the example, you need to:
>
> - Create the **People** custom table according to the instructions in [Creating custom tables](https://docs.kentico.com/k9/developing-websites/defining-website-content-structure/custom-tables/creating-custom-tables.md)
> - Add data to the table as described in [Managing custom table data](https://docs.kentico.com/k9/developing-websites/defining-website-content-structure/custom-tables/managing-custom-table-data.md)
## Setting up the custom table web part
Start by preparing a page that loads and renders data from the custom table:
1. Open the **Pages** application.
2. Select the page where you want to display the custom table data.
3. Open the **Design** tab.
4. [Add](https://docs.kentico.com/k9/developing-websites/developing-websites-using-the-portal-engine/using-and-configuring-web-parts.md) the **Custom table repeater** web part onto the page.
5. Set the following properties for the web part:
- **Custom table**: People
- **Selected item querystring key**: itemid
- **Selected item database column name**: ItemID
- **Selected item validation type**: Validation by number
- **HTML envelope -> Content before**:
```xml
```
- **HTML envelope -> Content after**:
```xml
```
6. Click **OK**.
The web part does not display any data for now, because you have not assigned transformations. The **HTML envelope** properties add a table element around the web part. The transformations created in the next sections will fill the content of the table.
> **Info:** To learn more about setting up custom table web parts, see [Displaying data from custom tables](https://docs.kentico.com/k9/developing-websites/loading-and-displaying-data-on-websites/displaying-data-from-custom-tables.md).
## Writing the list transformation
The purpose of list transformations is to display multiple items on the same page. The Custom table repeater applies the list transformation to every record loaded from the specified custom table. In this example, the "list" is composed of table rows.
1. In the **Pages** application, configure (double-click) the _Custom table repeater_ web part (on the **Design** tab).
2. Click **New** next to the **Transformation** property. The **New transformation** dialog opens.
3. Change the **Class type** to _Custom table_ and select _People_ as the **Custom table** value.
4. Type _**ListItem**_ as the **Transformation name**.
5. Change the **Transformation type** to _**Text / XML**_.
6. Copy the following code into the transformation editor:
```xml
| {% ItemID %} |
{% FirstName %} {% LastName %} |
View information |
```
7. Click **Save** and close the dialog.
8. Click **OK** to confirm and close the **Web part properties** dialog.
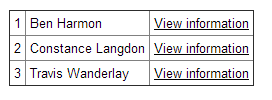
The transformation defines a table row, which the repeater renders for every record in the **People** custom table. If you view the page on the live site, you can see the custom table's data.
## Writing the detail transformation
To allow users to view more information about individual people from the custom table, you need to create a second transformation for the detail view:
1. In the **Pages** application, configure (double-click) the _Custom table repeater_ web part again.
2. Click **New** next to the **Selected item transformation** property. The **New transformation** dialog opens.
3. Change the **Class type** to _Custom table_ and select _People_ as the **Custom table** value.
4. Type _**ItemDetails**_ as the **Transformation name**.
5. Change the **Transformation type** to _**Text / XML**_.
6. Copy the following code into the transformation editor:
```html
| First name |
{% FirstName %} |
| Last name |
{% LastName %} |
| Date of birth |
{% DateOfBirth.ToShortDateString() %} |
| ID |
{% ItemID %} |
| Last modified |
{% ItemModifiedWhen %} |
| Personal GUID |
{% ItemGUID %} |
|
Back to list
|
```
7. **Save** the transformation and close the dialog.
8. Click **OK** to confirm and close the **Web part properties** dialog.
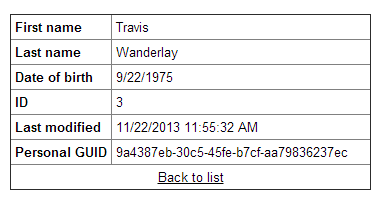
The Custom table repeater applies the detail transformations when a single record is selected via a URL parameter.
On the live site, you can now click the View information link next to individual people in the list. The table changes and displays the data of the selected person.
> **Tip:** **Tip - previewing transformations**
>
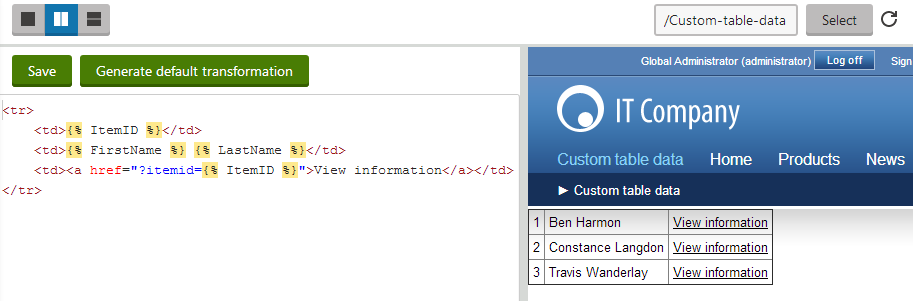
> When editing the code of transformations that are already assigned to a web part, you can [preview the output directly](https://docs.kentico.com/k9/developing-websites/previewing-design-changes.md). Click **Preview** in the dialog header. The editor opens a split view, where you can see how the content displayed by the web part changes when you save the transformation code.
>
>