
Using smart fields in forms
Kentico EMS required
Features described on this page require the Kentico EMS license.
Smart fields are a feature that helps keep your forms short and easy to complete. Forms with smart fields allow you to collect data gradually over multiple submissions. When a user views the form for the first time, only an initial set of “standard” fields is displayed. Smart fields appear only on subsequent views of the same form, as replacements for fields which the given user has already filled.
For example, imagine that you need a large form to gather information from customers about their preferences and shopping patterns. If you show a form with 30 question fields all at once, many people will lose patience while filling in the form or even ignore it completely. With smart fields, you can create a form that displays only one or two fields at a time, and place it onto a page that customers frequently pass through. People are more likely to fill in the data in small chunks, and the form collects the information over time.
Similar functionality may also be known under the terms “progressive fields”, “queued fields” or “progressive forms”. In the Kentico documentation, forms containing smart fields are referred to as smart forms.
Contact tracking requirement
In order to display smart fields correctly, the system needs to know which users have submitted a given form and which fields they have already filled. The contact tracking feature is used for this purpose. As a result, filtering and hiding of smart fields only works for visitors who are tracked as contacts by the system.
Before you can use smart forms, your site’s developers need to:
- Configure and implement tracking of contacts on the website.
- Consider data protection regulations, such as the GDPR. If required, implement a way for visitors to give and revoke tracking consent.
For users who are not tracked as contacts (either if contact tracking is not enabled on the website, or for users who do not give consent to being tracked), forms always display all fields, including smart fields. In these cases, repeated submissions of the form by the same visitor create separate records in the form data.
Contact identifier and merging
The system automatically adds a Contact Guid field to forms that contain at least one smart field. This field stores an identifier of the contact who submitted the given form record. The field only serves for internal purposes, and you can ignore it when managing the form’s recorded data (or configure the interface to not display the field).
If a contact is merged with a different contact, the system does NOT merge the data of the related form records. In these cases, the smart form displays fields according to the data submitted by the main contact left over after the merge.
Building forms with smart fields
The following steps guide you through the process of creating a smart form:
Open the Forms application.
Create or edit () a form.
Select the Form builder tab.
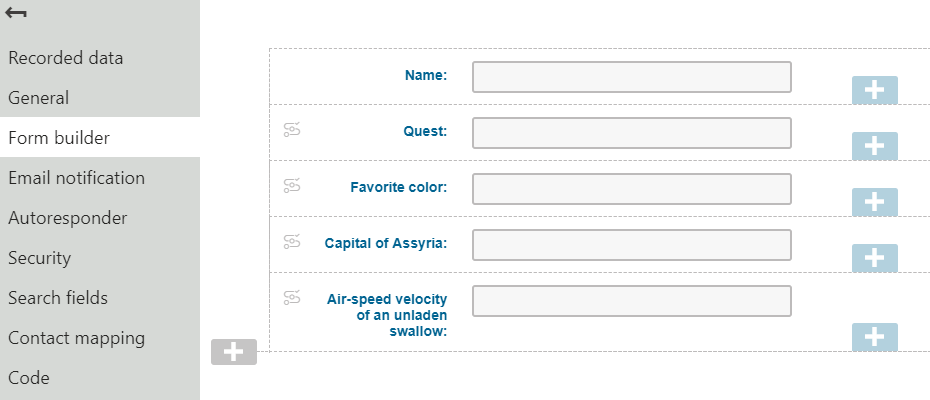
Add a number of standard fields to the form (see Composing forms for details).
- These are the fields that users see when viewing the form for the first time.
- The total number of fields displayed in the form always matches the number of standard fields (non-smart).
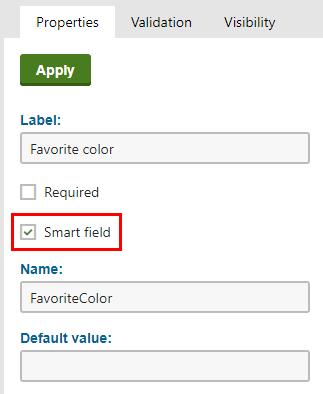
Add additional fields and enable the Smart field option in their properties panel.
- These are the fields that users do not see initially. The form only displays them on subsequent views as replacements for other fields that a given user has filled.
Make sure your fields are organized and ordered in a way that makes sense for a smart form:
- You can imagine smart forms as a queue of fields. The order in the queue is the same as the order of fields in the form builder (from top to bottom in the default layout).
- Always place the form’s standard fields before the smart fields.
- We recommend placing your most important smart fields first.
- Avoid fields that only make sense when viewed together with another specific field.
The form builder interface displays the icon next to smart fields.
We recommend placing smart forms onto pages that your site’s users visit repeatedly.
After a visitor (who is tracked as a contact) submits the form, the system links the resulting form record with the given person. When the same person views the form again, fields that already have values are replaced by smart fields (according to the field order in the form builder). If the user submits the form again, the system automatically ensures that the data is updated within the existing form record. This process repeats until all fields have values. Once all fields are filled, the smart form is no longer displayed at all for the given visitor.
Notes
- Smart fields cannot be Required. Because smart fields are not always displayed, making them required would prevent users from submitting the form.
- Setting visibility conditions for fields in smart forms may lead to inconsistent displaying and hiding of fields. Fields hidden due to a visibility condition are replaced by the next item in the queue of smart fields.
- If you wish to add a Consent agreement field to a smart form (see Working with consents on MVC sites), do not configure the consent field as a smart field. You also need to ensure that the text of the consent covers all possible fields in the form, even though the visitor might see only a small subset when accepting the agreement.
- Placing a form containing smart fields on a page automatically disables any output caching functionality configured for the given page.